Have you ever been in a position where you needed to reduce the file size of the media so that you could edit it hassle-free? I’ve been there and done that.
When you have media files with the highest quality and the biggest file size, Kinemaster may misbehave. When this happens, we may need to transcode a media file. Today, I’ll show you how to transcode in Kinemaster to fix that problem.
Earlier, the Kinemaster app didn’t have a transcode feature, so I used external sources to do it. However, with the latest update, we can now transcode any media file from within the Kinemaster app. It is advantageous in many ways, which you will know soon as you read below.
Table of Contents
ToggleWhat is Transcode in Kinemaster?
Transcoding in Kinemaster is a process of changing a media file to work with the Kinemaster app. It optimises the media and adjusts the bitrate, frame rate, and resolution that Kinemaster can handle so that editing goes smoothly.
Transcoding doesn’t only mean reducing but also increasing the bitrate and frame rate.
You can transcode the media you import from your device, including the media in the timeline and the layers. Even the assets downloaded from the Asset Store could be transcoded if necessary.
Why do we need to Transcode a media file?
Transcoding has been around for a long time, and there are many reasons why we need it. Here are some of the reasons why we need to transcode a media file or video in Kinemaster:
- Transcoding can fix many problems with Kinemaster, such as the crashing issue, problems with re-encoding, problems with files that Kinemaster doesn’t support, and so on.
- It lowers the video’s resolution and changes the bitrate and frame rate so that they work with the app and device.
- Transcoding the media files can solve the lagging problem.
- You may need to transcode if the media’s codec doesn’t support the Kinemaster app.
- Transcoding can improve the quality of a media file by changing it to a format that supports a higher resolution, frame rate, or bit rate.
How to Transcode in Kinemaster?
Follow these steps to change the format of a media file in Kinemaster:
- Open your Kinemaster app > create a project or open one you already have > Add media files to the main timeline and layers.
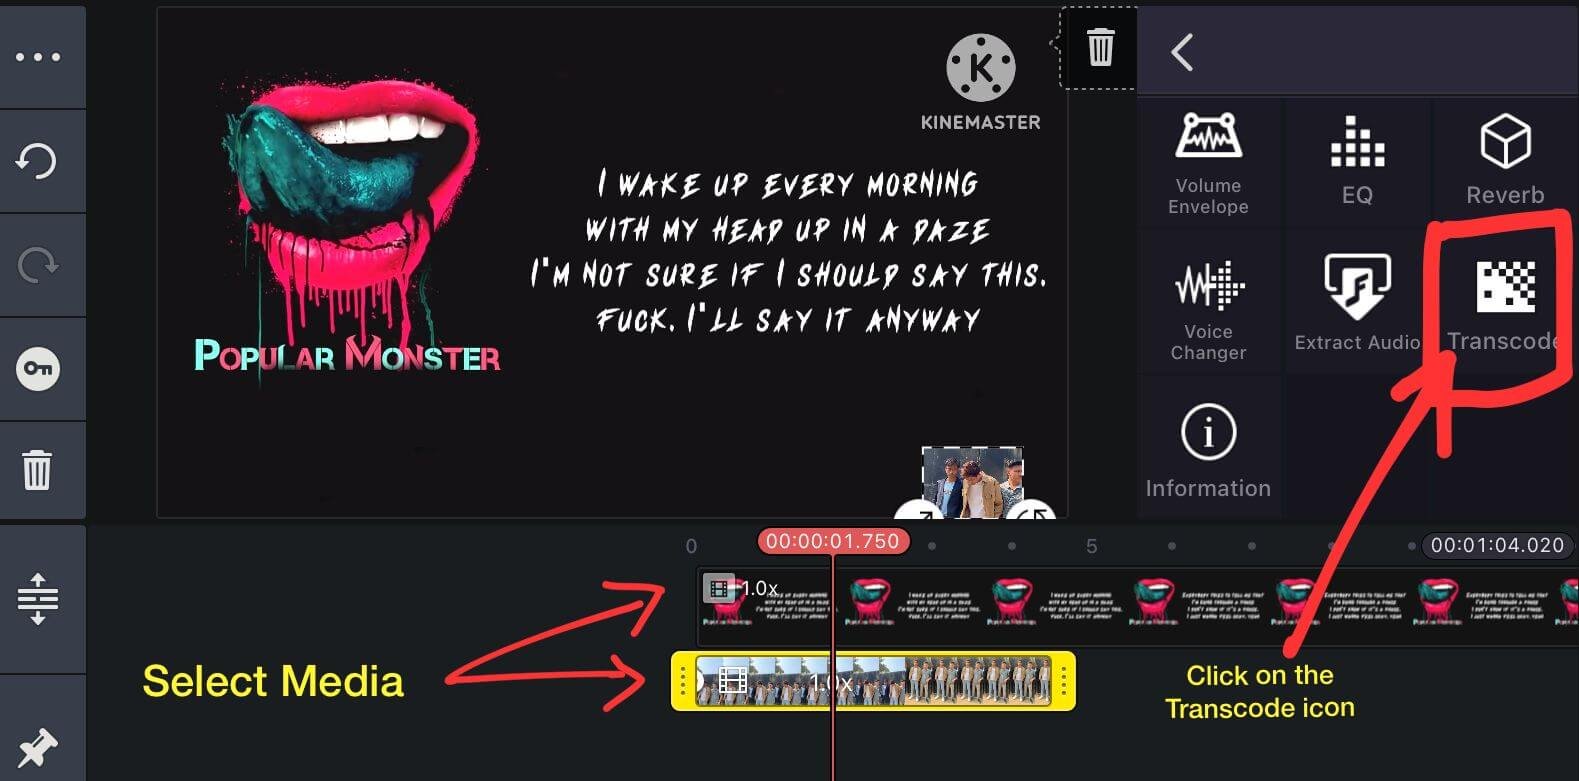
- Choose the video, audio, or other media file from the timeline and click the “Transcode” icon.

- You’ll see the setting for Transcoding. Using the slider, you can increase the video’s quality.
- Then, you can change the resolution. The original resolution of the video determines the highest resolution you can change.
- Similarly, you can change the video’s frame rate.
- If you toggle the switch, you can also make the same changes to all your media files simultaneously.

- When done with the settings, click the “Transcode” button. Your media will be transcoded within the Kinemaster app, and the original file will replace it.
Simple, isn’t it? Start transcoding your video, audio, or any media file for smooth editing in Kinemaster.
Conclusion
Kinemaster optimises media files through transcoding so that they can be edited easily and run better. With the most recent update, the transcoding feature in Kinemaster is now easier to find and use. Any media file can be transcoded right in the app, and you can change the resolution, frame rate, and bitrate as needed. I have shared how to transcode media in Kinemaster and why you must do it.


